Remembering the Memphis Sanitation Workers’ Strike: A Collaborative Mural
Lesson by Patty Bode and Stephanie Schmidt
Civil Rights Movement curricula are flooded with images of Dr. King in saintlike portraits, frequently exhibited with brief, benign text about his “dream.” This imagery oversimplifies the work of Dr. King and ignores the thousands of individuals who performed the many, complicated acts of resistance that aimed to change the course of history. Yet, visual art can enrich the study of history, can express a vision for the future, and can involve students in dynamic hands-on learning.
Here is an art lesson designed to introduce the complexity and role of ordinary people in the Civil Rights Movement. The addendum provides a practical guide to drawing images of people for murals.
See also these related lessons: A Study of Artist Aaron Douglas: Painting the Human Figure in the Tradition of Resistance and Marching for Civil Rights Today: A Collaborative Mural.
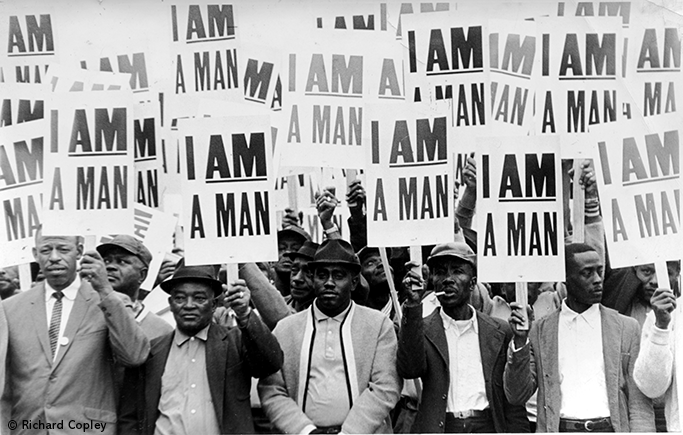
Striking members of AFSCME Local 1733 hold signs whose slogan symbolized the Memphis sanitation workers' 1968 campaign. At center is James Riley. To his right is Hubbell Clark. To Riley's left is a man known as "Jumping Jack." © Richard L. Copley
Grade Level: Upper elementary+
Time Required: Three class periods
Objectives
Students will understand the sociopolitical context of the Memphis Sanitation Workers’ Strike through analysis of visual media.
Students will examine historical visual images in terms of style, structure, artistic function, and historical relevance.
Students will conceive and create works of visual art that demonstrate an understanding of the Civil Rights Movement.
Students will synthesize new information and engage in creative expression through collaborative mural-making.
Guiding Questions
What pictures come to mind when we think of the Civil Rights Movement?
What do we know about the Memphis Sanitation Workers’ Strike of 1968?
What pictures come to mind when we think about the Memphis Sanitation Workers’ Strike of 1968?
Why did the city government of Memphis take so long to settle the strike?
What images are important to depict on a mural to document the strike?
Is there a relationship between that strike and some struggles that we are engaged in today?
Materials
Film: At the River I Stand Directed by David Appleby, Allison Graham, and Steve Ross. 58 minutes. California Newsreel, 1993.
Sample paintings of strikes and protests to share
Art supplies
Large mural paper
Poster board
Craft sticks
Tempera paint
Brushes
Procedure
Class Discussion and Motivation
I ask the students what they know about the Memphis Sanitation Workers’ Strike and list all their answers. Perhaps they believe they do not know much, so I break down the question.
“Where is Memphis? What do we know about it?” We find it on a map and discuss what we can tell from its location, e.g., climate. “What do we know about sanitation workers?” They help keep our neighborhoods clean, safe, and healthy by carrying away the trash. “What do we know about the word strike?” That’s when workers stop going to their jobs until they are treated fairly by the people in charge of their work. This strategy builds on students’ knowledge and places students’ voices at the center of the discussion. Continue the discussion as long as needed to tell the story of the strike.
View At the River I Stand. (58 minutes; you may split this over two class periods or choose portions of the film to view)
After viewing and discussing the film, show students paintings of strikes and protests. My two favorites are in picture books. My Dream of Martin Luther King (Crown, 1995), written and illustrated by Faith Ringgold, has captivating illustrations of protesters holding signs on pages 7, 8, and 9. Martin Luther King (Greenwillow Books, 1995), written by Rosemary L. Bray and illustrated by Malcah Zeldis, has a colorful painting on page 43. These illustrations can inspire the students’ work. I also show photographs of protesters, marchers, and strikers from the era, which I find on the internet.
The Mural: Overview and Technique
The marching protest figures for this lesson can be drawn and colored in with a material or technique the teacher selects. Drawing instructions are explained in more detail in the addendum. Divide the class into two groups. One group will create signs and figures and the second group will paint scenery for the mural.
The sign-making group can view some of the signs and slogans created by the sanitation workers in 1968 by using google image search. Students can also use their imaginations to write original, powerful slogans for the signs. They then glue the signs to craft sticks so they can later be glued to the marching figure.
The scenery group paints the setting for the strike. They should remember that they will be gluing figures of marching people onto the mural, so the mural does not need too much detail. A successful approach is to ask students to draw a long horizon line for the sky and a street for the marchers to follow. Then draw buildings to show some of the businesses that they boycotted, such as newspaper offices and others that did not support the sanitation workers’ cause.
Students then paint the scenery with tempera paint. After the paint is dry, students glue their signs to their marchers and then attach their marchers to the mural.
Extensions
This art unit may be integrated with social studies and English work on the Civil Rights Movement or with any story of struggle and resistance. It can also be adapted to represent other stories of oppression and organized protest.
Synthesize, Assess, Evaluate
Exhibit the completed mural in a public display space. Hold class discussion and make a new list of guiding questions. Write down students’ answers and compare them to the answers to guiding questions from the beginning of the unit. Have students look through current newspapers, both local and national, for other stories of struggle and resistance. Connect this information to what they have just learned about the Civil Rights Movement.
Addendum: Drawing People for Our Mural
Social messages about who gets to be empowered as artists and how artistic talent is positioned in schools and society may cause some students to feel inadequate when approaching a drawing lesson. These feelings of inadequacy may be displayed in reluctance to participate. The following suggestions are meant to invite reluctant artists into the classroom community art activity. These suggestions are not meant to restrict stylistic expression or repress exploration of many other strategies for drawing a person. Teachers are encouraged to use these strategies and illustrations as tools to create full participation by all learners in the class. Each student will use these tools a little differently to arrive at her or his rendering of a person.
How big to make it?
Each classroom community will decide how large the mural will be. The size of the mural will help to determine the average size of each human figure/civil rights marcher. I like working with 12” x 18” paper for each figure. If we have lots of space for a big mural, we use 18” x 24” paper for each figure. If space is limited, however, standard 9” x 12” paper works just as well. Keep in mind, students usually draw a bit smaller than the paper, therefore after they cut out the figure, it will be even smaller in size than the paper.
Figure 1

Figure 1: Average human proportion.
Use the head to estimate the scale. People grow into different shapes and stature: tall, short, thin, muscular, petite, etc. Figure 1 illustrates the average proportion of the human figure. No matter how tall or short, wide or thin, each feature is in proportion to other features. Many artists use the head to figure out the scale of the figure. The height of the human figure is equal in scale to approximately 7½ heads stacked in a row!
Teacher tool: Cut out one oval out of poster board or index card for each student to use as a template for the shape for the head of their figure. Be sure it is scaled so that 7½ heads will fit on the paper that students will be using to make their figures. When students have a template to start drawing the head, it invites them to jump right in to drawing and helps allay some of the anxiety of getting started on the blank page. Teachers can photocopy figures 1 through 5 to put on students’ desks to help them visualize the scale.
Some students may benefit from cutting out 7½ ovals so they can stack them on their paper. They may also line them up “inside” the torso, arms, and legs of their drawings to help get more accurate proportion. They may want to fold their ovals in half to fit them inside arms and legs.
Class discussion: Things to notice about figure 1: (This discussion is much more fun if teacher uses her own body to illustrate along with the diagram, or uses student volunteers). It may be useful to enlarge the diagram in figure 1 on a photocopy machine. Cut out some colorful ovals which match the size of the head, to place on top of the diagram while discussing scale and proportion. Remember these are average proportions; each of us will vary a bit from the average!
TORSO: The torso (shoulders to hips) is equal to three heads. The distance from shoulders to belly button is two heads and then belly button to hips is one head. Find where the belly button should be on figure 1 and draw it with a bright color.
UPPER ARM: Shoulder to elbow is the length of two heads!
FOREARM & HAND: Elbow all the way to finger tips is the length of two heads. Notice where the elbow is a tiny bit above the belly button. It is very common to draw the arms out of proportion and to make the hands end around the waist. But look! The hands end all the way down mid-thigh. Also, it is very common to draw the hands extra small. Put your hand on your face with the heel of your palm on your chin and stretch your hand up your face your hand is almost as tall as your head. Try to draw it large enough.
UPPER LEG: Hip to knee is equal in length to two heads.
LOWER LEG: Knee to foot is equal to about 1½ heads.
Notice your foot is even longer than your hand. It is common to draw the foot too small in scale to the rest of the body, so be aware of the size of the feet. Make them big enough to hold up those strong civil rights marchers.
Figure 2

Figure 2: After you draw the figure with basic ovals, you may add detail with clothing and hair or you may turn it into an Aaron Douglas style silhouette.
Things to notice about figure 2: The human figure in oval shapes may be turned into any kind of person wearing any kind of clothes. It may also be turned into an Aaron Douglas style silhouette. All you have to do is add the detail to make it the type of figure that suits your mural. Be sure to erase all the oval lines after you add detail. Erasing unnecessary lines is a very important step. Notice that Aaron Douglas-style figures are much more angular around the edges. Think about that when adding your finishing touches.
Student Activity
First rough draft sketch: On rough draft paper (which is the same size as the final draft paper), practice drawing ovals in the shape of a person standing straight. Don’t think about clothes or hair or girl features or boy features. Just think about ovals. Think about the proportion and scale in figure 1. After you draw the head, draw an oval for each section: torso (three heads), upper arm (two heads), lower arm all the way to the tip of the fingers (two heads — but the hand is not a whole head — try to figure it out), upper leg (two heads), lower leg all the way to the foot (1½ heads).
Second rough draft sketch: On more rough draft paper draw a person in oval shapes in the active stance of a civil rights protester. Practice different poses with your friends. Notice where the elbows are. Notice where the knees are. Notice the crease in the hips when people are marching or walking. Is the head straight or tilted? Draw your favorite pose with oval shapes. Do not think about detail. Just think about ovals and active poses. Study figures 3, 4,
Final draft paper: Draw your favorite pose in oval shapes very lightly with pencil. Then add the detail. Are you showing details of clothing or creating a silhouette in the style of Aaron Douglas? Refer to figures 3, 4. Erase all the oval lines. Complete your civil rights marcher with the materials available to your class. Great job!

Figure 3: Figure with ovals, with details, and as Aaron Douglas style silhouette.

Figure 4: Figure with ovals, with details, and as Aaron Douglas style silhouette.